")
")
")
")
")
")
")
")
")
")
")
")
")
")


WebTrader
Looking for a simple yet feature rich trading platform? Our WebTrader trading terminal in your browser window is the ideal solution if a trader prefers a concise, easy-to-learn interface for trading, but also want to use all the basic functions and trading tools as in a regular installation terminal.


For those who prefer a simpler trading environment, our company offers WebTrader as an alternative to the feature-rich Trader Workstation (TWS) software. WebTrader is a simplified version of the trading platform. This platform is more suitable for those who mainly make deals with one instrument or use only the main types of orders.
A simple and intuitive interface allows you to quickly access market data and transfer orders from an account when using TWS is not possible. WebTrader is a great alternative for users behind a firewall. The program runs and runs over the Internet, so you can log into the account and trade from any computer with Internet access. The program has a simple HTML-based interface, and allows you to create and manage orders without having to download the program itself.
Trading platform overview and functions

Access to WebTrader
Once the account is approved, the client will be able to successfully log into the WebTrader platform.
Click on the Login to WebTrader button at the top of our website.
Enter the username and password for the account.
NOTE: it is impossible to simultaneously log into several trading platforms at once. This limitation applies to the following platforms: TWS, WebTrader, mobileTWS for iPhone or iPad, TWS Blackberry or MobileTrader.
The checkbox on the login screen allows you to save your WebTrader settings to the server. If this option is checked, any changes you make will be saved and used the next time you log into WebTrader, regardless of where you log in from.
For security reasons, your session will expire after 9 minutes of inactivity. This does not in any way affect pending open orders. To resume trading, click the "Return to WebTrader" button on the expiration page and re-enter.
Add quotes to the platform
WebTrader supports direct access to exchanges and markets and enables our clients to trade options, futures, stocks, bonds, CFDs and the forex market from one universal account. To add quotes and market data - you need to log into Account Management and subscribe to market data by going to the Market Data Subscriptions page.
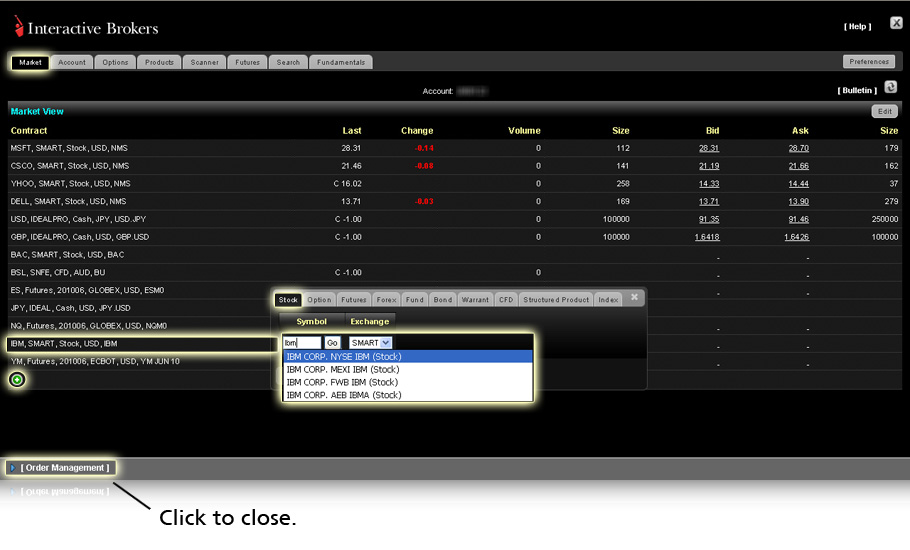
- Click on the Market deposit, then click the green Multilevel button at the end of the ticker list.
- In the Add a new contract window, select the type of asset by clicking on the appropriate tab, and then enter the symbol and click the Go button.
- In the list of available assets, select the contract you want to add.
- You can see the contract added to the ticker list on the Market page by going to the Edit Market View.
Continue adding your contracts on the Market page in the Add New Contract window. Choose SMART as your default router to get the best rebates and execution prices through our SmartRouting.
When you are finished adding your contracts, close the Add New Contract window by clicking the x in the upper right corner of the window.
Submitting orders
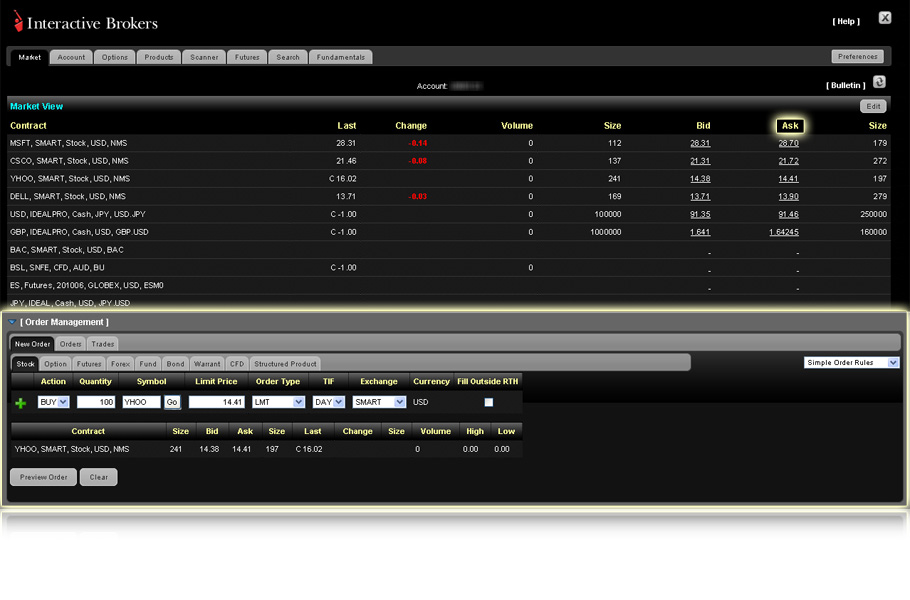
You can place your orders on any page of the WebTrader terminal. To create your order:
- Click on Ask to create a Buy order or Bid to create a Sell order for the selected contract.
- On the New Order tab in the Order Management Panel, you can change the order of instruments, price, volume, order type, exchange and much more.
- You can add order attributes by clicking on the green Multilevel (+) sign, then select the corresponding checkbox below the order.
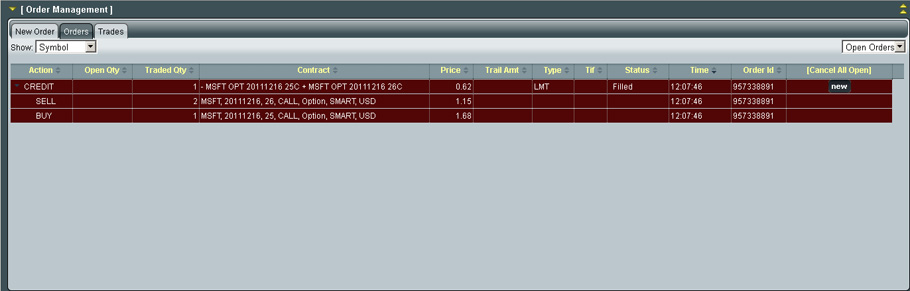
- The color-coded order status is displayed in the "Open Orders" tab.
- In the "Orders" tab, you can view and change any not yet executed order, as well as request its cancellation.
- In the case of attached orders, only the working order is displayed. Use the arrow in the Action field to expand the display area and view orders that have not yet been triggered.
- You can change the parameters of any unexecuted order.
- On the Orders page, click the Edit button in the corresponding line of the contract description. The order window will open, in which you can make changes.
- Click Revert to revert to the original settings before the order was changed.
- Click the Cancel button to close the order window without making any changes.
- The status color will change to the current order status.
Click on the blue arrow located in the Order Management pane, then select New Order. Enter the contract, then click the Go! Next, select the asset you want to buy or sell from the list of contracts.
Click on Preview Order and Submit Order to submit the order.

Clients can use Expert Mode to quickly submit applications. Select Expert Mode in the Preferences window.
Trading activity
Click on the Account tab and the account page will open. This page will show real-time balances and balances, margin margins, purchasing power, profit and loss, market value of assets and other account details.
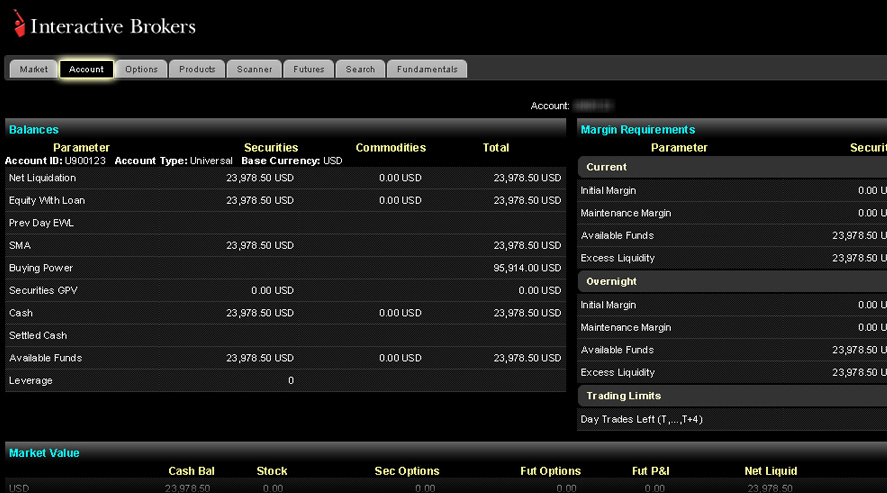
- Account balances - taking into account the current market value.
- Margin Monitor - margin requirements in the base currency of the account.
- Market Value - Cash and product values in each currency.
- Positions - market value of positions, average price realized / unrealized P&L.
- Average cost: the average cost of opening positions in stocks and options on securities, including commissions.
- Unrealized P&L (profit and loss): (market value of positions) - (average value).
- The total unrealized P&L is now displayed.
View positions
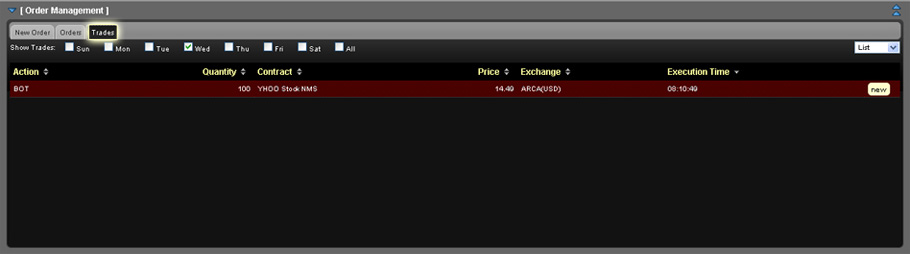
View real-time reports on transactions for all together or for each individual contract. Click on the blue arrow on the Order Management panel to expand the panel, then click on the Trades tab. This page displays daily reports of all orders and positions. View a list of details for each trade, or a brief description of the trading activity by selecting the appropriate option from the drop-down list in the upper right corner of the panel.
- The "Trades" tab displays the current day's trades divided by action, as well as a list of all executions for each underlying.
- The "Show deals" button allows you to display the deals made during the previous 7 days.
- From the drop-down menu located in the upper right corner of the Trades tab, select List or Summary.
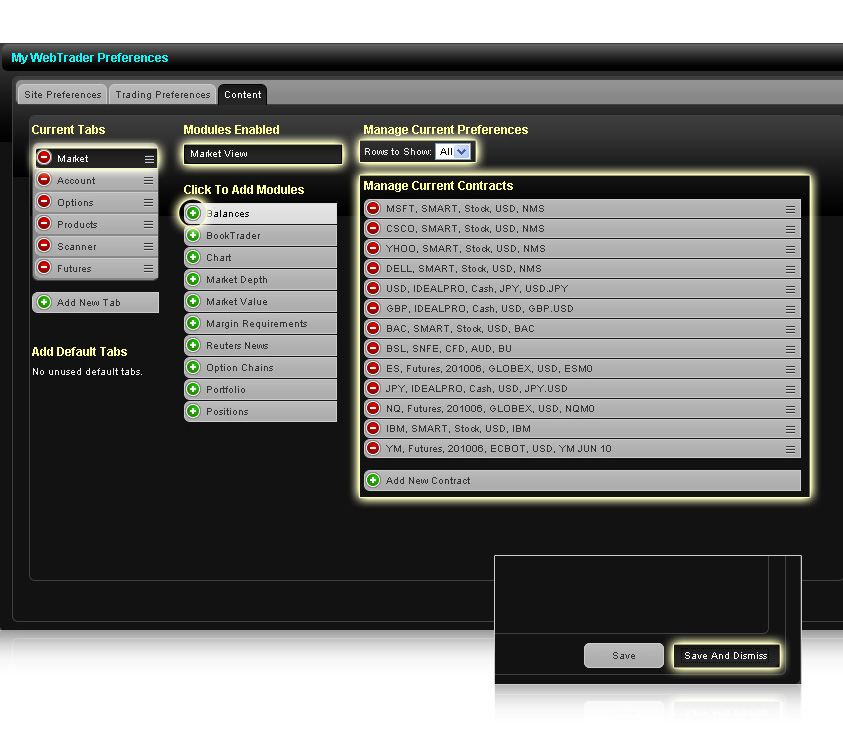
Add module to page
 Ability to add modules for most pages in the WebTrader platform. Add Market Watch, Charts, BookTrader, Market Depth, Open Orders and other modules can be added in the Preferences window.
- Click on a tab to open the page where you want to add your module, click on the Preferences button.
- Click on the Content tab.
- On the current tab, Current Tabs, the current section and module, which are visible on this page, are highlighted.
- All available modules for the current page are listed. Click Add Module - Click to Add Modules that you want to add to the page.
- Some modules have additional parameters. They appear in the Manage Current Preferences section. For example, you can set the number of rows for the Market View module.
- Add or remove contracts in the module via the Manage Current Contracts section.
- Click Save and Dismiss - Save and Close when done.
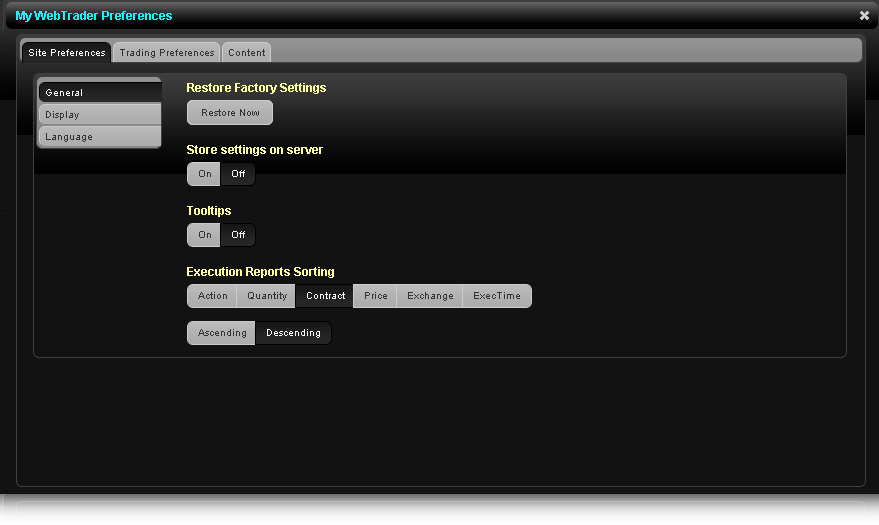
Setting preferences
Using the Preferences window allows you to change the font size and style, switch between normal and expert modes, change the size and types of contracts, change the settings for the report on executed orders, and the platform language.
Click on the Preference button to open the preferences window.
Preference Window - Contains three categories of settings:
- General - Restore factory settings, choose to save the settings to the server, enable or disable prompts, and set the sort order of the execution reports that appear on the Trades tab in the Order Management Pane.
- Display - Select the color of the WebTrader platform: Dark or Light Skin.
- Language - Select your language for the WebTrader platform.
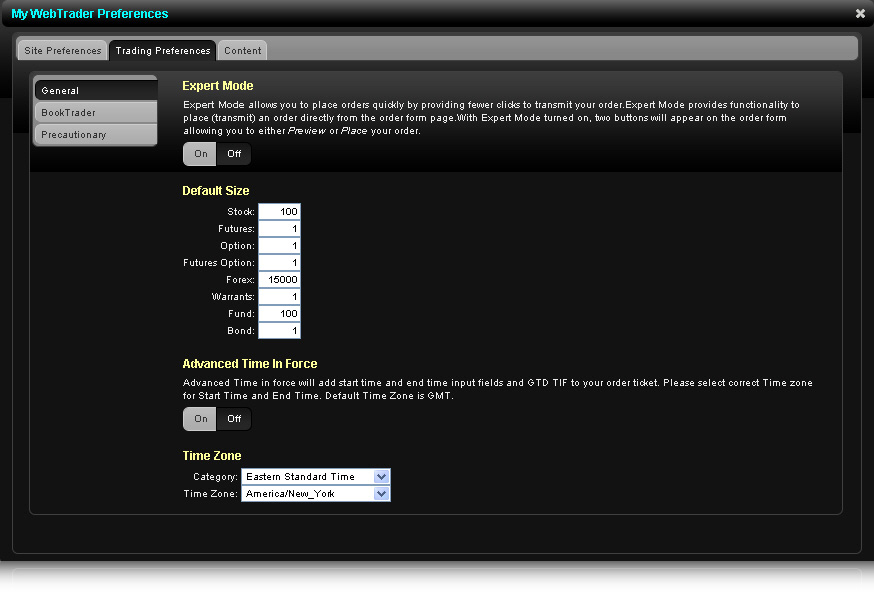
Trade Preference - has three such categories of settings:
- General - Expert Mode enable or disable, set the volume for each type of contract, enable or disable Advanced Time in effect and select the time zone.
- BookTrader in Expert Mode on or off, set the default size for orders from BookTrader for each type of contract.
- Precautionary - Enter the percentage of precaution for each type of contract.
Content - You can add your new tabbed pages in the WebTrader trading platform, add or remove modules from the page, and customize individual modules on each page:
- Current Tabs - change the order of tabs by dragging the tab to a new position; you can delete tabbed pages by clicking the minus sign, add a custom tab by clicking the Add New Tab button.
- Modules Enabled - Add and remove modules from tabbed pages. First click on the page, in the Current Tab section - Current Tabs, and then click the minus sign to remove modules from this page, and the Multilevel sign to add the required modules.
- Manage Current Preferences - Change settings for individual modules. First click on the page, in the Current Tabs section, select it, and then select and change it to your liking. Please note that not all modules have flexible parameters.
- Manage Current Contracts Manage Current Contracts - Install and remove from each module. First click on the page, under Current Tabs, select it, and then select the modules to include in the section. Use the minus and Multilevel icons to remove and add contracts. When adding a contract, use the contract search to identify the instrument type and contract.
After completing the installation and setting preferences, click the Save and Dismiss button.
Market pulse
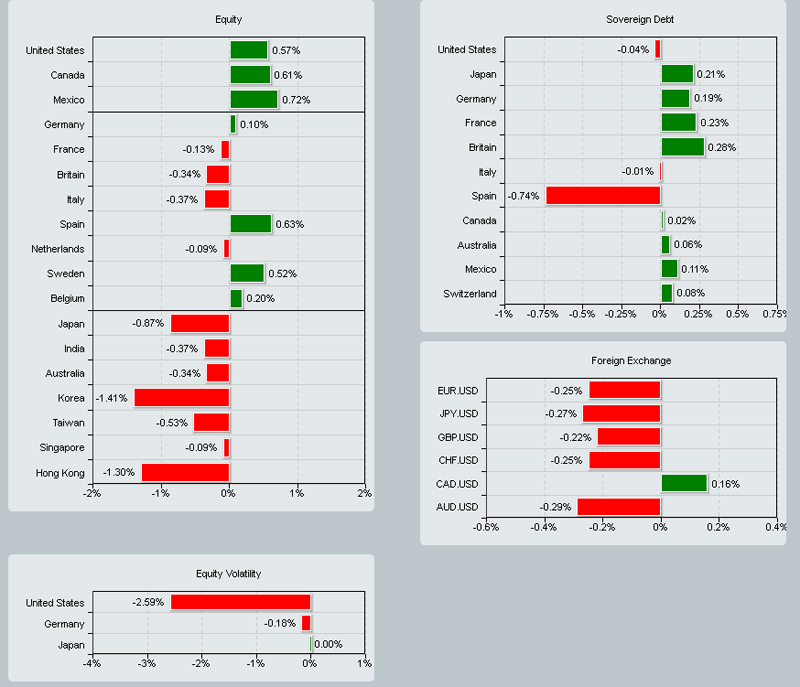
The Market Pulse window appears when loading WebTrader after entering the program. The Market Pulse window displays bar charts that provide an overview of market conditions with a 15 minute delay. Information about the state of affairs in the market includes the current percentage change in indices and bonds of different countries, as well as exchange rates. After downloading WebTrader, you will be able to view this data in a separate tab called "Market Pulse".
Market data
- Streaming
- Streaming market data is only supported by the most recent versions of web browsers. If your browser does not support WebTrader streaming market data, the data will be updated every ten seconds.
- The current status of streaming market data is displayed on the Market Data tab in the Settings window.
- You can also set the number of decimal places to display for streaming market data on the Market Data tab in the Settings window.
- Note: if you run WebTrader through Account Management, streaming market data and the "Market Data" tab in the settings window will not be available. To access these features, you must launch WebTrader directly from our website.
- Streaming market data is supported by the latest Firefox, Chrome and Safari browsers. Currently streaming data is NOT SUPPORTED by any version of Internet Explorer.
- Delayed
- Market data is available with latency for contracts for which you have not subscribed to market data.
- The next time you log into WebTrader, you will be prompted to enable market data with a delay for non-subscription contracts. Your preference will be saved.
- You can turn lagged market data on and off in the Market Data tab in the WebTrader settings window. Thus, if you decide to enable market data with a delay the next time you log into WebTrader, you can disable the receipt of this data in the "Settings" window.
WebTrader bookmarks
WebTrader has separate pages for specific tasks, which helps not to overload the interface with unnecessary detail, and information is easily perceived in separate tabs.
- Markets Page Panel
- The Markets Page pane displays data about the markets you are subscribed to.
- The list of displayed contracts is configured as follows:
- To add tickers, click on the green + sign at the bottom of the ticker list. In the window that appears, select the type of instrument from the drop-down list, and then enter the symbol for the underlying.
- Set additional parameters such as direction, right (put or call), strike and expiration (if necessary), then click Add contract. The contract will be highlighted in the ticker list for a while.
- To reorganize the ticker list, click the Edit button in the header of the Markets Page panel. The screen will display red minus icons to remove any ticker, as well as three-bar buttons on the right side. To move the ticker line, click on the button with three bars and move the mouse while holding the button.
- You can remove and add columns, as well as change their display order in most modules in which data is presented in columns. These are the "Market", "Options" tabs and the search results in the "Scanner" tab. You can add and remove columns, as well as change their order.
- To remove columns, click the Edit button located on the right side of the screen, and then click on the red minus sign next to the column you want to remove. After you finish deleting columns, click the Done button (the Edit button is replaced by the Done button in edit mode).
- To add columns, click the Edit button on the right side of the screen, and then click Add Column (next to the green Layered icon). In the column selection dialog, the selected columns are shown on the left, and on the right are those columns that are not currently displayed. Click on the green Layered icon next to the column you wish to add. Each added column will appear at the end of the list on the left.
- After closing this window, it will be displayed at the right edge of the current tab. You can also delete a column using the column selection dialog by clicking on the red minus sign next to the column name on the left side of the dialog box. Click Remove All to remove all columns or Add All to add all available columns. Click OK to save your changes. Click the "Finish" button to save all changes.

Orders are created by clicking on the bid or ask price in the market data line. This opens the "Order Management" panel, which allows you to set additional order parameters before sending.
Orders control panel
The Order Management panel is displayed in several WebTrader tabs. Each page has an arrow icon in the panel header that is used to expand and collapse the panel.
There are three main tabs on the order control panel: New order, Orders and Deals. They are used to create, modify and manage orders, as well as to view completed orders.
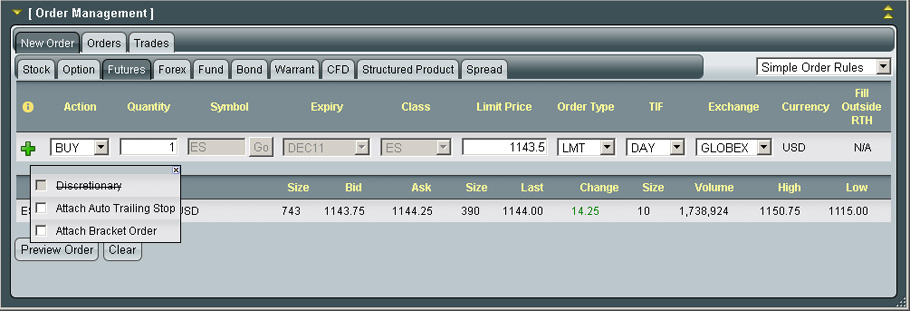
- New order tab
- Click on the desired product type tab (stock, option, futures, etc.). The order entry fields corresponding to the selected security type will appear on the screen.
- Type a character, and then click the Forward button or the Tab or Enter key. Select a contract from the dropdown list.
- Enter the rest of the order parameters, and then click the Preview button.
- When you're ready to proceed, click Submit Order.
- WebTrader only supports basic order types: Limit, Market, Stop, and Stop Limit, LPZ, RPZ, Trailing Stop and Trailing Stop Limit orders.
- Order Attributes - in combination with a limit order, you can select an additional order attribute by clicking on the big green "+" sign:
- At your discretion - specify the amount that will be added to or subtracted from the limit price. This allows you to expand the range within which the execution of this order is allowed.
- Attach Trailing Stop - Sets the stop price for a sell order at a fixed level below the market price. When the market price rises, the stop price rises in parallel with it, and if the market price goes down, the stop price remains unchanged. For a buy order, this works in the opposite way.
- Bracket order - designed to limit losses and fix profits by "surrounding" the order with two opposite orders.
- Validity time - "simple order rules" are applied by default.
- Extended validity time - when you select this option in the drop-down menu on the right, the "Start Time / Date" or "End Time / Date" fields will be added, and the order validity time will change to GDD ("Good Till Date"). Make sure you set the correct time zone in the settings.
- Selecting the "Execute outside the exchange session" option allows the execution of orders outside the exchange session. Information on working with orders for US futures is available on the website.
Click the "Preview" button to see the commission and margin requirements for the order before submitting it. The margin information shows the total initial and minimum margin, as well as the total amount of equity with credit if the trade is executed.
If all the order parameters are correct, click the Submit Order button. To modify the order, click the Modify button on the Preview panel and change the required parameters.
If you have the "expert mode" enabled (activated on the Settings page), then you can send orders directly from the orders tab.
Spreads

- In the "Spread" tab on the order control panel, you can select one of the proposed spread strategies or create your own spread by selecting the "Personal" option.
- You can also create a spread from option chains in the Options tab: click on the arrow next to the bid / ask price for a call or put option to display a list of spreads.
- Select a spread from the list of available strategies, enter the ticker and click "Next"
- Spread order legs are displayed in a table.
- Using the drop-down lists, you can select the expiration date, strike or put / call.
- The table will be automatically filled in according to the selected strategy.
- Select or change order parameters for each leg. Values are displayed by default.
- Click on the lock icon to make all fields active.
- WebTrader, in turn, reloads the updated legs and identifies the spread as debit or credit.
- Click the "Preview" button to confirm and submit the order.
- Custom spread
1. Select the Personal option in the drop-down list of strategies, enter a symbol and click "Next".
2. The program offers to choose the spread instruments: option / option, option / share or futures.
3. Select buy or sell and enter the first leg of the spread.
4. Click on the green Stacked icon on the right side to add leg (s). A red minus sign will remove the leg from the order.
5. Repeat the previous steps for each leg of your spread.
6. The fields under the spread legs (credit / debit, quantity, net price) will be automatically filled in based on the parameters you selected.
7. Click Preview and then Submit or Edit to go back and change the order parameters.
Options
Option chains are displayed on the Options tab page. You can add separate bookmarks for each underlying, as well as create orders with the click of a mouse button.
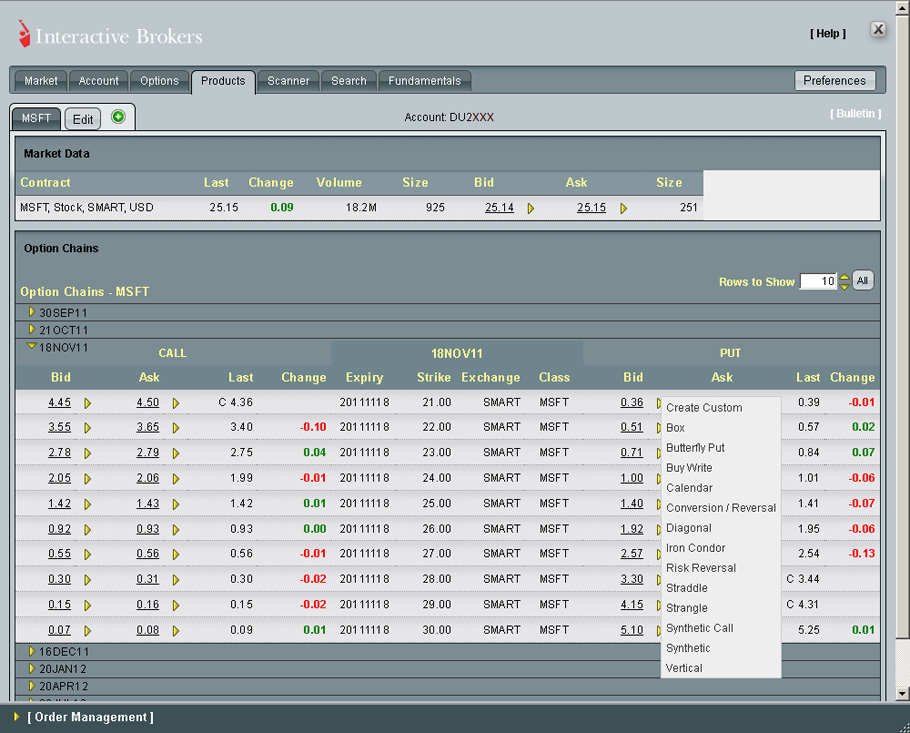
To add a new bookmark with option chains, you need to do the following:
- Click on the green "+" sign and enter the underlying in the upper right corner.
- A new tab will open with a quote line for the underlying, and the option chains will be displayed in expiration order. The first in the list are the options with the closest expiration date.
- Call options are listed on the left and put options on the right.
- You can start creating an order by clicking on the bid or ask price.
- In the "Content" tab in the settings window, you can specify the number of expiration dates and strikes displayed in the "Options" tab.
- Option contracts trading
Once you have specified the underlying and opened the option chains, you can create an order:
- Click on the ask price of any option to create a sell order. Clicking on the offer price will start creating a buy order.
- Change the parameters in the "Order Management" panel if necessary.
- Click the "Submit Order" button.
- Using the arrows next to the bid / ask prices, you can choose a ready-made spread strategy or create your own.
Charts
Flash-based interactive charts show price movement and volume in stocks, futures or indices. When you first enter a symbol, you select the time period and chart type. These parameters can be changed after the graph is displayed.
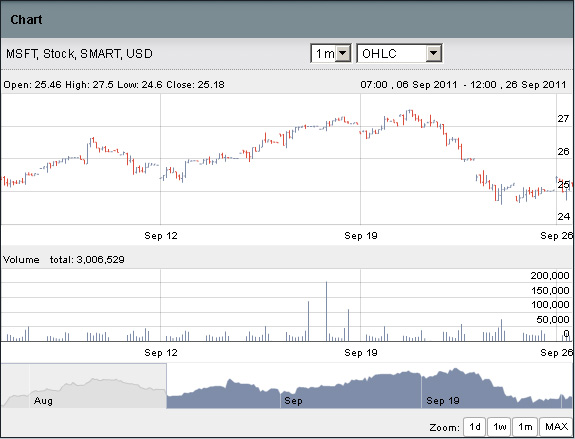
- Time period: you can select 1 or 5 days, 1, 3 or 6 months, and also 1 year or 5 years.
- Graph type: the ability to select the type of graph. You can choose from such chart types as "line", "OHLC" (Open, High, Low, Close) and "candlestick".
- Hover your mouse over the graph to highlight the data point. At the top of the line chart, start, low, high, and last price data are displayed, as well as volume data corresponding to the data point that the cursor is pointing to.
- By default, the graph displays data for the maximum period of time that was selected by the user (the MAX button restores the display of the maximum period).
- Zoom buttons located at the bottom of the graph allow you to change the time scale.
- Click on the button resembling a lever on the left or right of the volume bar and drag it towards the middle to shorten the time range and see more detailed data on the segment of the main line of the graph.
Scanners
Market scanners allow you to quickly scan the desired markets and display the most suitable contracts that match the specified search parameters and the specified filter criteria. In the "Scanner" tab, you can specify the following search criteria:
- Instrument: Select US stocks, US non-US stocks, European stocks, or Asia stocks.
- Location: Select the location / exchange whose data will be included in the search. The list of available locations depends on the selected tool.
- Parameter: Select one of the available scanner parameters, such as "top gainers%", "contracts hot in price" or "highest implied option volatility".
- Filter: Optionally, you can filter your search results based on price or dividend income.
- Scan results can be sorted in ascending or descending order of any of the columns.
- You can create buy or sell orders directly from the search results.

BookTrader

This tool allows you to view the deep book data for the selected contract, as well as create and place orders. If you activate BookTrader Expert Mode (Settings), your order will be created and sent with one click on the Bid or Ask size field.
You can add the BookTrader function to any page using the settings button in the upper right corner. Select BookTrader and click Save to close the window and load this trading instrument. To use BookTrader, enter the underlying symbol and instrument type, then click Next !. Click on the contract you wish to download to display market depth data.
- BookTrader has two modes:
- Expert mode - when the "BookTrader Expert Mode" option is selected, orders will be created and sent by clicking on a price level in the price scale. Click on the yellow Bid Amount box to create a sell limit order. Clicking on the green field Demand value will create a limit buy order.
In BookTrader Expert Mode, Open Orders and Fills will be automatically shown, even if they have not been displayed previously. - Normal mode - clicking on the Amount of demand or Amount of supply field will create an order, but it will not be sent automatically.
Please note that when creating an order in normal mode, as well as when submitting an order in expert mode, the default order size will be used. The default order size can be changed in the order management window or set in the trading settings in the "BookTrader" section.
Market depth
The "Market Depth" panel displays alternative quotes that are outside the range of bid and ask prices, which allows you to more accurately assess market liquidity.
To create an order through the "Market Depth" panel, select a price and fill out an order ticket.

Settings
WebTrader has separate tabs for specific tasks. Thus, the interface is not overloaded with many elements, and the information is easily perceived by the user. The "Settings" button allows you to adapt the interface to the needs of the user, manage the current bookmarks, and add and remove modules.

You can customize the trading platform according to your preferences.
- Site settings - in this tab you can choose between the light and dark background of the platform, change the general settings and change the interface language.
- Trade settings - the ability to customize default order sizes, order validity time and time zone.
- Content - This tab is used to add data modules to any WebTrader tab.
- The tab has three columns. Select an added bookmark or use the green "+" sign to add your own bookmark.
- Available modules can be added to the selected bookmark using the green "+" sign, or removed from the bookmark by clicking on the red "-" icon.
- The third column allows you to customize the content of the selected module.
- Market data
- The current status of streaming market data is displayed on the Market Data tab in the Settings window.
- You can also set the number of decimal places to display for streaming market data on the Market Data tab in the Settings window.
- Streaming market data is only supported by the most recent versions of web browsers. If your web browser does not support streaming market data in WebTrader, the data will be updated every ten seconds.
- If you have not subscribed to market data for any contracts, then you can display market data with a delay for them.